According to Google's Search Engine Optimization Starter Guide images should be placed in one folder rather than being scattered about your folder hierarchy.
[su_custom_gallery source="media: 2864" width="354" height="570" title="always" class="hidden-xs alignright"]
WordPress when installed is set to "Organise my uploads into month- and year-based folders" under the Dashboard/Settings/Media page. Unless you are running a blogging site with many users adding content I find the long tree to be hard to work with, especially when you are trying to find images from an FTP Client.
It's a good idea to turn this feature off for business and personal sites and it will make your images easier to find and manage.
Naming Image Files
The Search Engine Optimization Starter Guide also says that image file names and ALT text should be optimised to make it easier for image search projects like Google Image Search to better understand your images.
[su_spacer]Moving your WordPress Images
Google would like all of your images in one place. To do this open your wp-config.php file and enter the following lines:
/*Change the default image storage folder for SEO purposes */
define( 'UPLOADS', ''.'images' );
This will change the image folder from http://yourdomain.com/images/ to http://yourdomain.com/images/.
You can now copy your images across including all of those year and month sub folders.
Removing the Year Month Sub Folders
If you clear the "Organise my uploads into month- and year-based folders" option it will only work for uploads that follow. Older posts will have their images organised into years and months.
Moving your images to the Image folder
An easy way to do this is to log on to your server with an FTP Client like Filezilla for example. Navigate to the [site-root]/images/ folder.
- Next open up the File Explorer on your computer by hitting the Windows key and E together and then navigate to your image root folder. For example, if they're all arranged underneath
C:\Users\public_html\wp-content\uploads\, go to that pictures folder where you will see all the other month/year folders. - Type "*.jpg, *.png" into the Search box at the top-right. All files and folders under your current position will be listed.
- Sort by name, which will group all the folders together, and then all the files together as well (in a flat view, regardless of what folder they are really in).
- Select all the photos and drag them into the root folder.
- Using your FTP client delete the old
/imagesfolder on the website. - Copy the
/imagesfolder on your computer to[site-root]/images.
Updating the WordPress Database
If you go to your WordPress site you will notice that the older posts with their images stored in the year and month folders will not display. The WordPress database still contains the old references for each post.
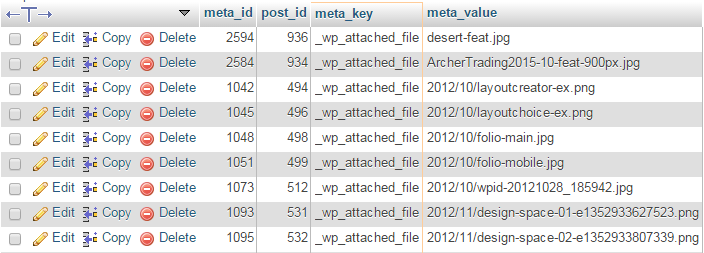
Open up phpMyAdmin from your CPanel account and open the database for the website. Browse the wp_postmeta table. In it there is data for every parameter relating to each post. We are only interested in the _wp_attached_file entries.
Using the following SQL filter the data to get the following:
SELECT *
FROM [your database name].wp_postmeta
WHERE `meta_key` = '_wp_attached_file'

The meta_value column contains the image references relative to the UPLOADS value set in the wp-config.php file.
Removing the Year/Month References
If you only have a few it's easier to edit by hand the incorrect entries by removing the year and month and leaving only the image file name. For example 2010/11/myimage.jpg becomes myimage.jpg.
If there are a lot of entries it's easier to use some SQL to do it for you, as follows. Before running back up your table by using the Export option in phpMyAdmin.
UPDATE [your database name].wp_postmeta
 SET `meta_value`= SUBSTR(`meta_value`,9)
 WHERE `meta_key` = '_wp_attached_file' AND `meta_value` LIKE '20__/%';
The SUBSTR function returns the supplied string from the 9th character on-wards. The LIKE command uses wildcard characters "%" (any characters) and "_" (only one character) to grab the records that have "2012/" etc, at the start.
Once the SQL has run check that the meta_value field is showing the correct data and then test your site checking that the images are showing correctly.
Voila! Now your image folder conforms to Google standards.
References:
From the article:
http://www.wpbeginner.com/wp-tutorials/how-to-change-the-default-media-upload-location-in-wordpress-3-5/
Function Reference /wp_upload_dir – WordPress Codex
Related Posts
Leave a Reply
You must be logged in to post a comment.


